INON Strobe Quick Start/Set-up Guide
Setting up INON Z-240/D-2000/S-2000 Series using a fiber optic cable with point & shoot & DSLR housings with optical port.
Quick Start Guide
Suggested starting guidelines for setting up strobe with most point & shoot digicam/housing systems, and DSLR systems.
- Compatible camera/housing systems must have an internal strobe on camera (unless using a optical converter via Nauticam), and a transparent housing, or a housing with an optical window / optical connector.
- These are initial recommended settings. Modify settings as you learn, according to shooting conditions and desired exposures.
S-TTL Mode (compatible with digicams & DSLR cameras with a pre-flash ONLY! WILL NOT WORK with electrical sync cord connection)
Camera Settings:
- Set camera’s flash to “force flash”
- Make sure “red eye reduction” is OFF
- Set camera to ISO 100
- Set camera exposure mode to Manual, Shutter priority, Aperture priority, Auto or Program
Strobe Settings:
- Attach a fiber optic cable between strobe and housing
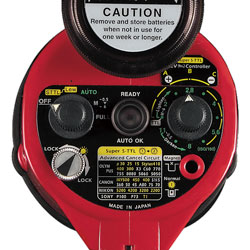
- Do NOT install the “Advance Cancel Circuit Switch” (magnet on D-2000 & S-2000 series strobes)
- Set EV Control Switch to B position
- Set Main Mode Switch to S-TTL
Operation:
- Make sure strobe is parallel to the lens or pointed towards subject
- Take an image
- To darken exposure, turn the EV Switch one click to the right toward the (–) and re-shoot image.
- To lighten exposure, turn the EV Switch one click to the left toward the (+) and re-shoot image.
Note: Digital cameras without a pre-flash are not compatible with S-TTL Mode.
External Auto Mode (Not available on D-2000S or S-2000 models)
Camera Settings:
- Set camera’s flash to “force flash”
- Make sure “red eye reduction” is OFF
- Set camera to ISO 100
- Set camera exposure mode to Aperture priority or Manual mode
Strobe Settings:
- Attach a fiber optic cable between strobe and housing
- For pre-flash digital cameras, do NOT insert the “Advance Cancel Circuit Switch” (magnet on D-2000 & S-2000)
- For digicams without a pre-flash insert the “Advance Cancel Circuit Switch” (magnet on D-2000 & S-2000)
- Set Main Mode Switch to AUTO
- Set EV Control Switch to match camera’s aperture setting (f-stop)
Operation:
- Make sure strobe is pointed towards subject
- Take an image
- To darken exposure, turn the EV Switch to the left and re-shoot image.
- To lighten exposure, turn the EV Switch to the right and re-shoot image.
Note: The strobe needs to be aimed towards the subject to achieve accurate exposure.
Note: If the +1/4 Flash Compensation Switch (located on face of strobe) is placed over the strobe sensor, the flash output will be ¼ stop brighter than the selected f-stop value on the EV controller.
Manual Mode
Camera Settings:
- Set camera’s flash to “force flash”
- Make sure “red eye reduction” is OFF
- Set camera exposure mode to Manual, Shutter priority, Aperture priority, Auto or Program.
- Set desired ISO Value (try ISO100 to start, adjust as necessary)
- Set desired Aperture Value (if in Manual or Aperture priority modes)
- Set desired Shutter Speed (if in Manual or Shutter priority modes)
Strobe Settings:
- Attach a fiber optic cable between strobe and housing
- For pre-flash digital cameras, do NOT insert the “Advance Cancel Circuit Switch” (magnet on D-2000 & S-2000)
- For digicams without a pre-flash insert the “Advance Cancel Circuit Switch” (magnet on D-2000 & S-2000)
- Set Main Mode Switch to M position
- *Turn EV Control Switch to FULL to achieve a full powered flash dump
Operation:
- Aim strobe as desired
- Take an image and check the exposure
- Rotating the EV Control Switch permits 12 steps of 0.5 stop incremental adjustment.
- Turn EV Control Switch to the right (clockwise) to increase flash output – lighten image, and re-shoot image for desired results.
- Turn switch to the left (counterclockwise) to decrease flash output – darken image, and re-shoot image for desired results.
- Besides adjusting exposure with EV control switch, experiment with Aperture, Shutter Speed, and ISO settings.
Setting up INON Z-240 Strobe with electrical sync cable and DSLR housings
Quick Start Guide
Suggested starting guidelines for setting up Z-240 strobe with DSLR and
other camera/housing systems having an electrical connection.
- Following are initial recommended settings. Modify settings as you learn, according to
shooting conditions and desired exposures. - Note: S-TTL Mode is not available when Z-240 is connected to camera/housing with
electrical sync cable. - Note: Some camera systems, in particular some high-end DSLR systems may not require
installation of the Insulation Plate. For optimum performance, test your system with and
without the Insulation Plate.
Manual Mode
Camera Settings:
- Set camera exposure mode to MANUAL
- Set desired ISO Value (for example, ISO 100)
- Set desired Aperture Value
- Set desired Shutter Speed
Strobe Settings:
- Install Insulation Plate on the housing side of the sync connector. Then attach sync cord to strobe and housing’s to 5-pin sync connector.
- Install magnet to deactivate the “Advanced Cancel Circuit Switch”
- Set Main Mode Switch to M position
- Turn EV Control Switch to FULL to achieve a full powered flash dump (FULL position always overrides EV Controller setting)
NOTE: **** MAKE SURE THE STROBE’S OPTICAL SENSOR CAP IS ATTACHED TO
THE OPTICAL SENSOR ****
Operation:
- Make sure strobe is pointed parallel to the lens or towards a subject
- Take an image and check the exposure
- Rotating the EV Control Switch permits 12 steps of 0.5 stop incremental adjustment.
- Turn EV Control Switch to the right (clockwise) to increase flash output – lighten image, and re-shoot image for desired results.
- Turn switch to the left (counterclockwise) to decrease flash output – darken image, and re-shoot image for desired results.
- Besides adjusting exposure with EV control switch, experiment with Aperture and Shutter Speed settings.
External Auto Mode
Camera Settings:
- Set camera to ISO 100
- Set camera exposure mode to Aperture priority or Manual
- Set desired Aperture Value
- Set desired Shutter Speed (only when in Manual Mode)
Strobe Settings:
- Install Insulation Plate on the housing side of the sync connector. Then attach sync cord to strobe and housing’s to 5-pin sync connector.
- Install magnet to activate the “Advanced Cancel Circuit Switch”
- Set Main Mode Switch to AUTO
- Set EV Control Switch to match camera’s aperture setting (f/stop)
NOTE: **** MAKE SURE THE STROBE’S OPTICAL SENSOR CAP IS ATTACHED TO THE OPTICAL SENSOR ****
Operation:
- Make sure strobe is pointed towards subject
- Take an image
- To darken exposure, turn the EV Switch to the right or (–) and re-shoot image.
- To lighten exposure, turn the EV Switch to the left or (+) and re-shoot image.
Note: The strobe must be aimed towards the subject to achieve accurate exposure.
If you have any questions please contact Aquaventure Dive & Photo Center (763) 424-8717


