Shooting Wide Angle
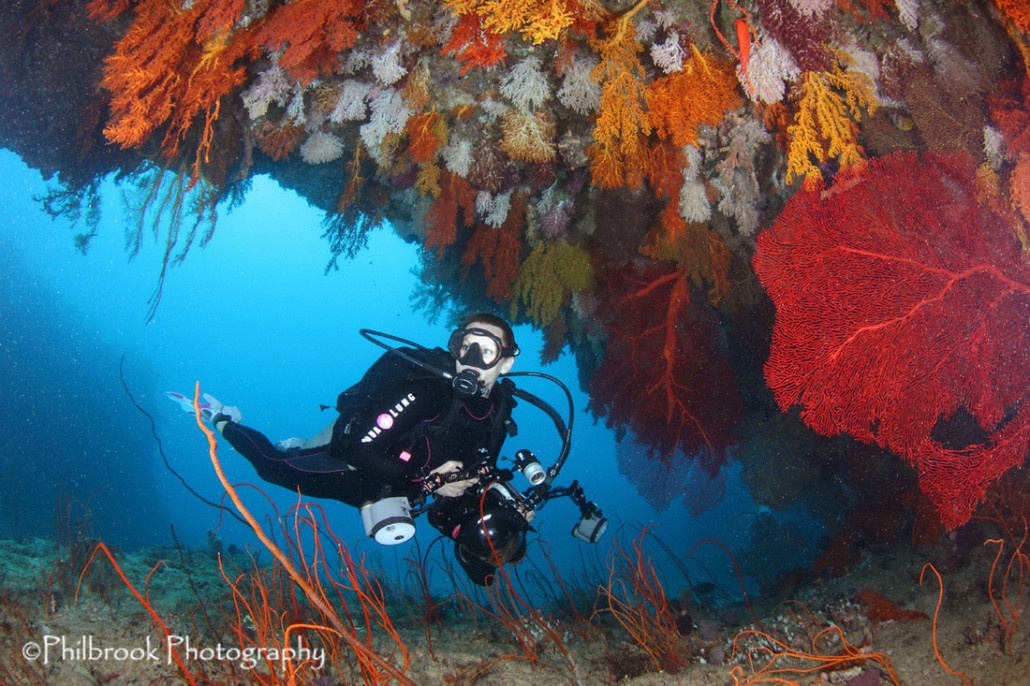
Tokina 10-17mm lens @ 10mm, aperture f/8, shutter speed 1/160, ISO 100
Wide angle photography has yielded some of the most dramatic images we see in underwater photography! It is also the most difficult to shoot due to the many elements that make up a wide angle image. Here are some of the basics to help you when shooting underwater wide angle images.
Lens Selection
There are a number of good lenses available for underwater wide angle photography. The lens should have a 100 degree angle of coverage (or more) with a minimum focus of 11” or less. Lenses that have a minimum focus of 12″ or greater will require a diopter to be able to focus sharply behind a dome port underwater. Fisheye lenses are a popular choice too. The Tokina 10-17mm fisheye lens has been the most popular choice since its inception and has a underwater angle of coverage of 100 degrees to 180 degrees (APS-C) and focuses down to 5.5″.
Dome Port Selection
Use a large 6”-10” dome:
- With rectilinear lenses (Sigma 10-20mm, Sigma 8-16mm, Tokina 11-16mm, Canon 10-22mm, Nikon 12-24mm, etc.) or with fisheye lenses (Tokina 10-17, Sigma 15mm, Nikon 10.5mm, Canon 8-15mm)
- For over/under shots (8″-10″ domes preferred)
Use a mini dome:
- With fisheye lenses only
- For close-focus wide angle shots
- For travel (if minimizing your weight and system size are necessary)
Camera Settings
I often get asked what my camera settings are for my images. Although I have consistent “pre-dive” settings, my settings vary from shot to shot throughout the dive depending on ambient light conditions. When shooting wide angle images, I set my ISO to the days lighting conditions, generally keep my aperture constant, adjust my shutter speed for my blue water color, and adjust my strobes manually to light the foreground.

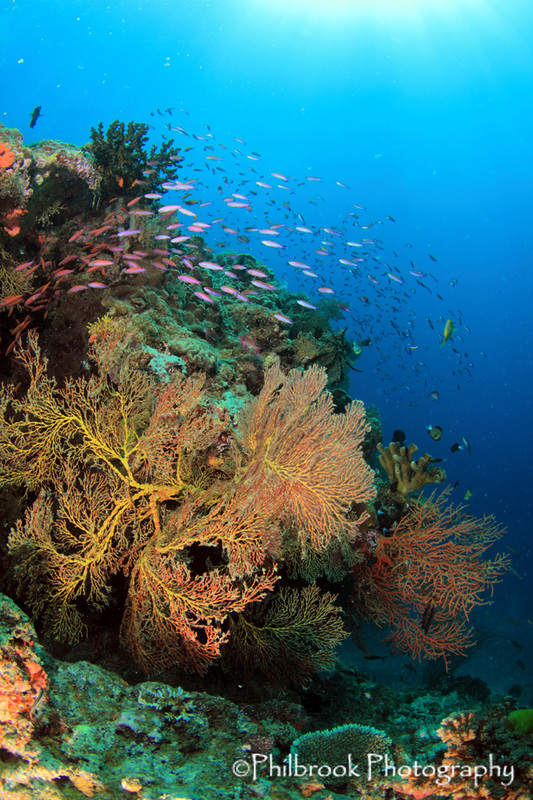
Sigma 10-20mm lens @ 10mm, aperture f/8, shutter speed 1/160, ISO 100
Shoot In RAW!!!
RAW files have 4000 color tones available to them. JPEG images have only 350.
Metering Mode
When shooting wide angle, set your camera’s metering mode for Evaluative Matrix. This will allow your camera to meter the entire scene, not just the center of the frame.
Shoot anywhere from -1/3 to – 1 on your exposure meter. Underexposing your images will help make the colors pop and avoid overexposing highlights.
Manual Mode
If using strobes, shoot in Manual mode. It allows you to take full control of your camera and eliminates the camera’s “auto” feature from being fooled. Balancing your artificial (strobe) light with the ambient light (background) is crucial.
Shutter Priority
If shooting fast action and/or ambient light (no strobes), Shutter Priority (Tv) can be used. Set Exposure Compensation (+/- button) to -1/3.
Shutter Speed
This is what I use to control the blue water color. In other words, the shutter speed controls your background exposure. 1/125 is a great starting point and is also my “pre-dive” setting. The faster the shutter speed the deeper the blue water (or background) color.
ISO Setting
Use ISO 100-200 on bright days. On cloudy days, ISO 320-400 works well. Your lowest ISO setting will give you the most optimum dynamic range within your camera.
Aperture
When using a large dome port (8” or more), f/8 is a good go to setting! It allows great depth of field and sharp corners within the image. When using a 6” dome set the aperture to f/9 –f/10 for sharp corners. When using mini 4” domes, set the aperture for f/11 or smaller to yield sharp corners. The center of your image, no matter what size dome you use, will be sharp.
White Balance
Shoot in auto white balance when using strobes! For the majority of the time, Auto WB is accurate when using artificial light.
When shooting ambient light, you can custom white balance to the depth you’re at or WB can be adjusted in post.
Strobes
Although TTL can get good results, it is generally not the best mode when shooting wide angle images. There’s usually too much going on within the image that can pre-maturely shut the strobe(s) down before accurate lighting can be achieved. Adjusting your strobe(s) output manually will yield better color saturatation.
Try to light with the angle of the sun. The wider the lens – the closer the strobe should be to the lens/port and angled out, not in (especially for close-focus wide angle images).
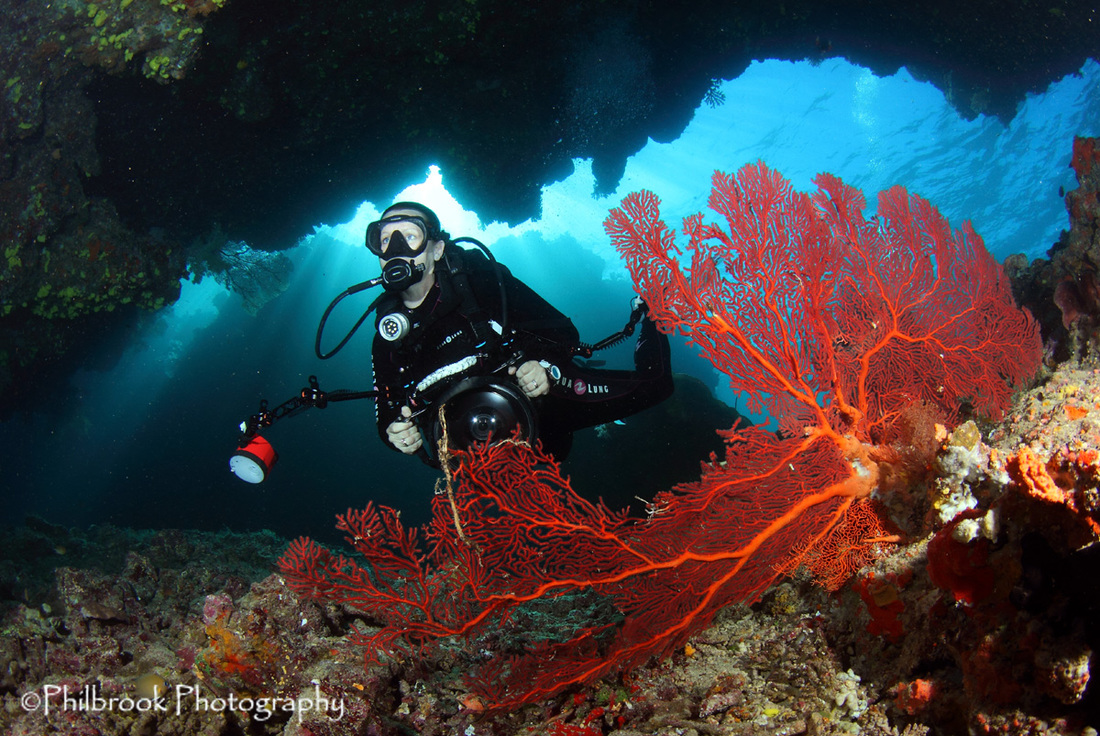
Tokina 10-17mm lens @ 10mm, aperture f/8, shutter speed 1/250, ISO 200
Composition Tip
Try to manufacture / compose your wide angle images to have a 3D quality to them
- Subject, coral, then sunball, boat or fish.
- Keep main subject out of the middle of the frame.
- Point the camera at a slight upward angle to take advantage of the ambient light for the background. This will add much better contrast than shooting down.
- Try portrait shots.

