INON Strobe Quick Start/Set-up Guide

Setting up INON Z-240/D-2000/S-2000 Series using a fiber optic cable with point & shoot & DSLR housings with optical port.

Quick Start Guide

Suggested starting guidelines for setting up strobe with most point & shoot digicam/housing systems, and DSLR systems.

  • Compatible camera/housing systems must have an internal strobe on camera (unless using a optical converter via Nauticam), and a transparent housing, or a housing with an optical window / optical connector.
  • These are initial recommended settings. Modify settings as you learn, according to shooting conditions and desired exposures.

S-TTL Mode (compatible with digicams & DSLR cameras with a pre-flash ONLY! WILL NOT WORK with electrical sync cord connection)

Camera Settings:

  1. Set camera’s flash to “force flash”
  2. Make sure “red eye reduction” is OFF
  3. Set camera to ISO 100
  4. Set camera exposure mode to Manual, Shutter priority, Aperture priority, Auto or Program

Strobe Settings:

  1. Attach a fiber optic cable between strobe and housing
  2. Do NOT install the “Advance Cancel Circuit Switch” (magnet on D-2000 & S-2000 series strobes)
  3. Set EV Control Switch to B position
  4. Set Main Mode Switch to S-TTL

Operation:

  1. Make sure strobe is parallel to the lens or pointed towards subject
  2. Take an image
  3. To darken exposure, turn the EV Switch one click to the right toward the (–) and re-shoot image.
  4. To lighten exposure, turn the EV Switch one click to the left toward the (+) and re-shoot image.

Note: Digital cameras without a pre-flash are not compatible with S-TTL Mode.

External Auto Mode (Not available on D-2000S or S-2000 models)

Camera Settings:

  1. Set camera’s flash to “force flash”
  2. Make sure “red eye reduction” is OFF
  3. Set camera to ISO 100
  4. Set camera exposure mode to Aperture priority or Manual mode

Strobe Settings:

  1. Attach a fiber optic cable between strobe and housing
  2. For pre-flash digital cameras, do NOT insert the “Advance Cancel Circuit Switch” (magnet on D-2000 & S-2000)
  3. For digicams without a pre-flash insert the “Advance Cancel Circuit Switch” (magnet on D-2000 & S-2000)
  4. Set Main Mode Switch to AUTO
  5. Set EV Control Switch to match camera’s aperture setting (f-stop)

Operation:

  1. Make sure strobe is pointed towards subject
  2. Take an image
  3. To darken exposure, turn the EV Switch to the left and re-shoot image.
  4. To lighten exposure, turn the EV Switch to the right and re-shoot image.

Note: The strobe needs to be aimed towards the subject to achieve accurate exposure.
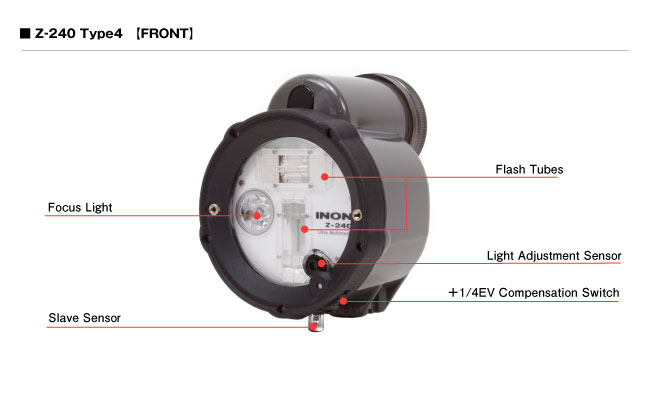
Note: If the +1/4 Flash Compensation Switch (located on face of strobe) is placed over the strobe sensor, the flash output will be ¼ stop brighter than the selected f-stop value on the EV controller.

Manual Mode

Camera Settings:

  1. Set camera’s flash to “force flash”
  2. Make sure “red eye reduction” is OFF
  3. Set camera exposure mode to Manual, Shutter priority, Aperture priority, Auto or Program.
  4. Set desired ISO Value (try ISO100 to start, adjust as necessary)
  5. Set desired Aperture Value (if in Manual or Aperture priority modes)
  6. Set desired Shutter Speed (if in Manual or Shutter priority modes)

Strobe Settings:

  1. Attach a fiber optic cable between strobe and housing
  2. For pre-flash digital cameras, do NOT insert the “Advance Cancel Circuit Switch” (magnet on D-2000 & S-2000)
  3. For digicams without a pre-flash insert the “Advance Cancel Circuit Switch” (magnet on D-2000 & S-2000)
  4. Set Main Mode Switch to M position
  5. *Turn EV Control Switch to FULL to achieve a full powered flash dump

Operation:

  1. Aim strobe as desired
  2. Take an image and check the exposure
  3. Rotating the EV Control Switch permits 12 steps of 0.5 stop incremental adjustment.
  4. Turn EV Control Switch to the right (clockwise) to increase flash output – lighten image, and re-shoot image for desired results.
  5. Turn switch to the left (counterclockwise) to decrease flash output – darken image, and re-shoot image for desired results.
  6. Besides adjusting exposure with EV control switch, experiment with Aperture, Shutter Speed, and ISO settings.

Setting up INON Z-240 Strobe with electrical sync cable and DSLR housings

Quick Start Guide
Suggested starting guidelines for setting up Z-240 strobe with DSLR and
other camera/housing systems having an electrical connection.

  • Following are initial recommended settings. Modify settings as you learn, according to
    shooting conditions and desired exposures.
  • Note: S-TTL Mode is not available when Z-240 is connected to camera/housing with
    electrical sync cable.
  • Note: Some camera systems, in particular some high-end DSLR systems may not require
    installation of the Insulation Plate. For optimum performance, test your system with and
    without the Insulation Plate.

Manual Mode

Camera Settings:

  1. Set camera exposure mode to MANUAL
  2. Set desired ISO Value (for example, ISO 100)
  3. Set desired Aperture Value
  4. Set desired Shutter Speed

Strobe Settings:

  1. Install Insulation Plate on the housing side of the sync connector. Then attach sync cord to strobe and housing’s to 5-pin sync connector.
  2. Install magnet to deactivate the “Advanced Cancel Circuit Switch”
  3. Set Main Mode Switch to M position
  4. Turn EV Control Switch to FULL to achieve a full powered flash dump (FULL position always overrides EV Controller setting)

NOTE: **** MAKE SURE THE STROBE’S OPTICAL SENSOR CAP IS ATTACHED TO
THE OPTICAL SENSOR ****

Operation:

  1. Make sure strobe is pointed parallel to the lens or towards a subject
  2. Take an image and check the exposure
  3. Rotating the EV Control Switch permits 12 steps of 0.5 stop incremental adjustment.
  4. Turn EV Control Switch to the right (clockwise) to increase flash output – lighten image, and re-shoot image for desired results.
  5. Turn switch to the left (counterclockwise) to decrease flash output – darken image, and re-shoot image for desired results.
  6. Besides adjusting exposure with EV control switch, experiment with Aperture and Shutter Speed settings.

External Auto Mode

Camera Settings:

  1. Set camera to ISO 100
  2. Set camera exposure mode to Aperture priority or Manual
  3. Set desired Aperture Value
  4. Set desired Shutter Speed (only when in Manual Mode)

Strobe Settings:

  1. Install Insulation Plate on the housing side of the sync connector. Then attach sync cord to strobe and housing’s to 5-pin sync connector.
  2. Install magnet to activate the “Advanced Cancel Circuit Switch”
  3. Set Main Mode Switch to AUTO
  4. Set EV Control Switch to match camera’s aperture setting (f/stop)

NOTE: **** MAKE SURE THE STROBE’S OPTICAL SENSOR CAP IS ATTACHED TO THE OPTICAL SENSOR ****

Operation:

  1. Make sure strobe is pointed towards subject
  2. Take an image
  3. To darken exposure, turn the EV Switch to the right or (–) and re-shoot image.
  4. To lighten exposure, turn the EV Switch to the left or (+) and re-shoot image.

Note: The strobe must be aimed towards the subject to achieve accurate exposure.

If you have any questions please contact Aquaventure Dive & Photo Center (763) 424-8717

INON Z-240 Type 4 Strobe Field Notes

inin-z-240-strobeIn the fast changing world of digital photography equipment there has been one product that has stood the test of time (with a few revisions for camera compatibility).  The INON Z-240.  The Z-240 is INON’s flagship strobe and has become one of the top choice in strobes for many underwater photo pros and enthusiasts since it’s release.

The big attraction to this strobe is not one feature but many that are stuffed into compact travel friendly sized housing.  INON has been able to do what other manufacturers have not and that is place high power clean light (guide number 24), S-TTL (optically slaved TTL), 100 degree circular beam (110 degree beam with diffuser), fast recycle time of 1.6 seconds at full power, multiple mode options, wireless TTL, and more into a robust strobe housing suitable for even tech divers with a 100m depth rating.  These features have had the competition chasing INON’s technology for quite some time.  Only Sea & Sea with their most recent release of the YS-D1 strobe has come close to achieving such success in a optical TTL strobe.

Z240_type4_frontThe Z-240 (as well as every strobe in INON’s lineup) uses four AA batteries in a uniquely designed battery compartment.  The battery compartment is sealed from the strobe’s inner circuit.  There is a one way check valve on the front of the battery compartment that will off gas expanding pressure  batteries emit if the compartment gets flooded.  This only buys you time though and the diver should abort the dive and discard the batteries or remove the batteries underwater to avoid a damaging the strobe beyond repair. The battery simply needs to be rinsed and dried out, clean the contacts with alcohol, and you’re ready to go again!

The Z-240 works well for all types of underwater photography from macro to portrait to wide angle.  It utilizes a twin flash tubes in a “T” configuration. By doing this the Z-240 emits a circular beam minimizing strobe fall off compared to a other traditional single flash tube strobes.

My wife and I have used these strobes in many different situations and the Z-240 has always delivered.  It also has a 180 lumen  focus light that emits a 20 degree beam.  I find this useful for adding light to achieve focus lock when shooting into dark coral crevices and similar situations however, it is not a video light.

INON has a variety of accessories available for the Z-240 from, diffusers, snoots, fiber optic cables, various arm attachments and more.  For a complete list of accessories click here

Here is a macro shot using a Canon 60mm lens @ f/8, 1/125, ISO 200, plus an INON UCL-165M67 Close-up lens and two INON Z-240 strobes.

fish-on-coral

Here is a portrait of two french angel fish taken with an Olympus 14-42mm lens @ f/9, 1/125, ISO 200 and single INON Z-240 strobe.

angels

Here is a wide angle shot taken using a Tokina 10-17mm fisheye lens @ f/8, 1/160, ISO 320, and two INON Z-240 strobes. The Z-240’s 13 step EV controller is extremely useful for dialing in the desired precise lighting.

diver-with-fan

One minor drawback of the Z-240 is when shooting strobe-filled sunball images during mid afternoon, at full power the strobe can be a stop or so under-powered. Shooting these images earlier in the morning or later in the afternoon tends to eliminate the issue.

This image was shot with a Tokina 10-17mm fisheye lens at 10:00am @ f/13, 1/250, ISO 500.

diver-with-sunball

Also, some photographers prefer a warmer color temperature than INON’s neutral color temp of 5500K for wide angle photography. However, there is a solution! INON now has 4600K and 4900K color diffusers available for their entire strobe line.

The other negative we hear from time to time is that the Z-240 can be confusing. This can be true (as in all photo equipment) if you do not take the time to learn the strobe, its configurations, and how to use each mode properly. However, once you’ve done that, vwahla, you have a very powerful, versatile strobe! It is highly recommended that you purchase your gear from a reputable dealer, such as Aquaventure Dive & Photo Center, who is willing and able to provide you with lifetime customer service and product education. Establishing that relationship will help eliminate confusion.

Looking at the back of the strobe we have the Main Mode Switch, Ready Light, EV Controller, Focus Light Switch, Electrical Bulkhead, and the Advance Cancel Circuit Switch or Pre-flash Switch.

Main Mode Switch – The main mode switch allows you to select which mode you want to shoot in.

S-TTL is compatible via optical connection ONLY.  It slaves the Z-240 with your camera’s on board flash (if your camera does not have a pre-flash S-TTL mode will not be compatible but AUTO mode is compatible for auto exposure).  The EV controller allows you to tweek the strobe’s output for desired exposure.

LOW is S-TTL mode but can be selected if your images are being a bit overexposed.  This setting does not allow the Z-240 to acheive a full dump.

AUTO is another auto exposure mode that differs from S-TTL.  When using this mode the photographer needs to set the f/stop on the camera then match it by selecting the same f/stop on the EV Controller.  The sensor on the face of the Z-240 senses the reflecting light.  The strobe then set the exposing flash.  On the face of the strobe there is a ring that can be placed over the sensor.  When this is done, the strobe’s output will be increased by 1/4 stop of it’s selected value.  There is a total of 24 steps available in this mode.

M (manual mode) This mode allows the shooter to adjust the strobe’s output manually.  There are 13 steps in 1/2 EV increments that allow for precision lighting.

FULL When FULL is selected the strobe will emit a full powered dump thus overriding any setting on the EV Controller.

Ready/TTL Light – The red light lets you know the strobe is ready to fire.  The green light lets you know TTL have been acheived.

EV Controller – Allows the shooter to adjust the output of the strobe in all modes except FULL mode.

Focus Light Switch – When pushing this switch in, the focus light will turn on for 8 seconds.  When the switch is pushed and turned to lock, the focus light will stay on continuously and shut off in sync with the camera’s shutter.

Advance Cancel Circuit Switch – This switch is used to configure or sync the strobe with your camera.  When using the optical connection and your camera’s flash has a pre-flash, the switch MUST BE IN THE OUT POSITION!  If your camera does not have a pre-flash or you are using the electrical connector, the switch MUST BE PUSHED IN!

Electrical Bulkhead – Allows the Z-240 to be connected via a variety of electrical cables.  It is a standard Sea & Sea connector.  TTL or S-TTL is NOT compatible with the electrical connection unless a TTL converter (Sea & Sea, Heinrichs & Weikamp) is used.

Canon EOS 70D / Nauticam NA-70D Field Test

school-of-fishIn today’s age of digital photography, camera companies are pushing out new models with new features every few months. Often, features on new models can be fairly insignificant compared to it’s predecessor (ie. more megapixels, larger LCD screen, etc). But eventually, a new model comes along that explodes with new features that make it worth an upgrade or jumping in to a system. Low and behold the Canon EOS 70D!

The 70D features 20-megapixels resolution (Canon’s highest to date for an APS-C size sensor), a flip out LCD screen, and a Dual pixel CMOS Auto-focus sensor. This sensor design is very different from previous Canon models. Each pixel measures the intensity of light and the direction it comes from and is made up of two photodiodes facing left and right. This helps the sensor to perform phase-detection autofocus.

Chris Parsons at Nauticam USA was nice enough to lend me Nauticam’s new NA-70D
housing to test out with the 70D camera. So off I went to Cozumel, where the oranges & reds pop like no other place in the Caribbean, to put this system to the test.

I appreciated was how easy it was to manipulate the camera in the housing. Known for having the best ergonomically designed housings on the market, Nauticam holds up that reputation again with the NA-70D!  All controls are easily reached and ideally placed. Placement of the “Q” button is ideal on the NA-70D. There is no need to look for it!  Just lift your left thumb and there it is. This placement allows easy access to any of the settings found on the “INFO” screen.

octopieAnother excellent feature is the 70D’s Movie Shooting Switch which allows you to jump from stills to video (same as on Canon’s EOS 7D). This is a huge advantage for shooting underwater!

The new “Vacuum Check & Leak Detection System” is AWESOME! Especially when changing lenses between dives!  The LED vacuum check light gives you great peace of mind in knowing your housing has seal integrity. I highly recommend adding this to any Nauticam D-SLR housing!

I was thoroughly impressed with the image quality of the 70D. The color depth, image detail, and dynamic range rival and possibly exceed that on the 7D, making this camera/housing combination one of the best valued DSLR options currently available.

After focusing on video the last few days, I was pleasantly surprised with the 70D’s Dual Pixel CMOS AF. The Canon 70D has phase-detection auto focus across 80% of the height and width of the sensor. This allows any area within that 80% to become a focus point. For those wanting auto focus on their video, the 70D delivers!  By utilizing phase-detection auto focus, keeping sharp focus while shooting HD video with mid zooms & macro lenses is much easier than the pre-focus only models (ie. 7D, 5D MKII). 

Final thoughts – I thoroughly enjoyed shooting the Canon EOS 70D!  Image quality is excellent and the phase-detection auto focus for video works extremely well!  The 70D out performs other systems in its price point and is an ideal camera for anyone wanting to upgrade from there Rebel series D-SLR or the 60D (or older models). The 70D, in combination with Nauticam’s NA-70D housing, will not disappoint!  

For a short sample video of low light, bright light, wide angle, and close-up performance, watch the video below.

Nauticam-side-viewsm