Packing Tips for Underwater Photo Gear

Traveling with underwater photo gear can be difficult, especially with today’s increasingly strict baggage limits!  The days of using big Pelican style (hard) cases for large camera rigs are pretty much gone unless you intend to check your system and possibly pay for excess weight.  I prefer to carry my camera system with me when I travel.  That way I know its safe and I don’t have worry about my luggage getting lost in transit. Here’s my packing technique.  Hopefully you will find it helpful!


When packing my DSLR system,  I like to assemble it first and then put everything else on the table that I will want for my trip, such as extra ports, lenses, gears, etc.  After I know everything I need is in front of me, I then pack each item as I disassemble the system.

Camera gear packing tips

Camera system – Assemble your system and lay everything else needed out ready to be packed. Don’t forget your O-rings!!

There are a number of ideal bags on the market made by various manufactures.  One of my favorite pieces that works well is the Departure Carry-On by Aqualung ($199).   It’s very light (7.2lbs) and fits DSLR housings very well (up to three)!  You will need to have  foam inserts, bubble wrap, or an insert from a camera bag that can be placed inside this bag to help protect your gear.   Another bag is the Armor Camera Bag. This insert is light weight, fairly rigid, versatile, and extremely affordable (only $59)!  It can be used on its own or placed in most backpacks or roller bags for more protection.

Armour camera bag

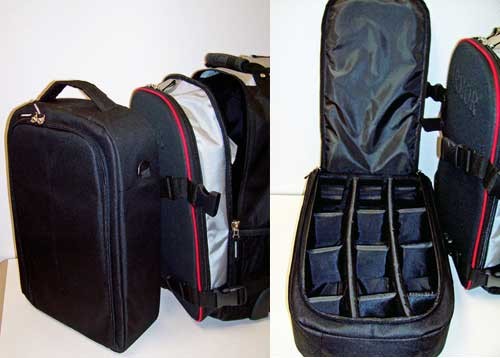
Armor Camera Bag insert and Carry-on Roller

Between these two bags, I can fit my entire system.  If weight becomes a problem (some airlines now weigh carry-ons), I check my large dome port, arms, and extension rings.  Here is a list of items I pack in the two bags above:

Departure Bag

  • Nauticam NA-70D housing
  • 60mm macro port
  • 100mm macro port
  • Mini dome
  • 20mm extension ring
  • 30mm extension ring
  • 50mm extension ring
  • INON Z-240 strobes (x2)
  • Fiber optic cables (x2)
  • 45 degree viewfinder
  • Dome diffusers (x2)

Armor Camera Bag (inserted inside Akona Travel Bag)

  • Canon 70D camera body (x2)
  • Tokina 10-17mm lens
  • Canon 60mm lens
  • Canon 100mm lens
  • Sigma 17-70mm lens
  • Kenko 1.4x teleceonverter
  • All gears stay on lenses
  • Keldan video light
  • Battery chargers (camera, AA, and video light)
  • Laptop & charger

I place my large dome port and strobe arms in padded regulator bags and then pack in my checked luggage – further padded by my clothes.

regulator bag

Put your large dome port in a regulator bag for more protection

packed camera gear

My entire system packed and ready to go! Bags used – Armor Camera Bag inserted in Akona’s Traveler Bag and Aqualung’s Departure Carry-on

Don’t let the weight and bag restrictions stress you out!  With the right carry-ons and a little creativity, packing even the largest DSLR systems is definitely manageable.  You’ve got this!


Cozumel Trip 2016

IMG_3722 IMG_3768 IMG_3838 IMG_3958 IMG_4008 IMG_4039 IMG_4108hi_res IMG_4121 IMG_4151 IMG_4160 IMG_4171 IMG_4224 IMG_4270 IMG_4304 IMG_4335 IMG_4398 IMG_4423 IMG_4449 IMG_4453 IMG_4499 IMG_4507 IMG_4536 IMG_4567eagle ray cozumel 2016 IMG_3772 IMG_3810 IMG_3963 IMG_4089 IMG_4129 IMG_4152 IMG_4159 IMG_4241 IMG_4260 IMG_4264 IMG_4313 IMG_4320 IMG_4323 IMG_4357 IMG_4484 IMG_4537

Shooting Sunballs

sunball image with diverShooting sunballs underwater is a great way to add depth to your compositions. They can be stunning if shot correctly but can also be tricky! Here are some tips on how to get great sunball shots.

Lens Selection

The most dramatic sunball shots are generally taken using a wide angle or fisheye lens. Get as close as you can to your subject. This allows your strobe to light the subject efficiently while retaining good scene composition.

Camera Settings

When shooting Sunballs, there are some go to settings for at least a starting point.

Manual Modereef scene with sunball

For sunballs, Manual mode is the best. It allow you to take full control of your camera which is needed for sunballs.

Shutter Speed

Set your shutter speed to the fastest speed available that your camera can synch with your strobe. This is usually between 1/180 and 1/320 of a second, which will vary by camera model. This will keep the water as deep blue as possible and help keep the sunball itself in a nice, tight circle. It will also freeze light rays if visible.

ISO 100

Use ISO 100 (or the lowest available ISO). Your lowest ISO setting will give you the most optimum dynamic range within your camera (minimize banding around the sunball).

Aperture

Aperture is the parameter you will use to control the foreground exposure of your image. For sunballs shots, the aperture is usually set between F/16 – F/22.

Strobes

Set your top strobe to full power / manual. DO NOT use TTL. The sun will shut your strobe down prior to proper exposure in TTL mode. Your bottom or second strobe (depending on if your shot is portrait or landscape) can be set to TTL or ½ power.  This will help keep from overexposing the bottom of your image.

sunball with diverComposition Tip

Sunballs are easier to control in the morning or late afternoon when the sun is not at it’s highest point. It’s also easier to find beams of light during these early and later times.

When shooting sunballs in mid-afternoon, Try hiding part of the sunball behind coral, a diver, boat, or larger animal to help avoid blowing out the sun.  You can also cut part of the sunball off the top of your image in the composition.  It also helps shooting the image vertically.  This allows the composition to take advantage of the blue water gradient from the top to bottom within the image.

For silhouette shots turn off your strobe(s).eagle ray with sunball

Shooting Macro

ghost pipefishMacro photography has been the most popular style of photography for quite some time! It’s fairly easy to get great results compared to shooting wide angle for a number of reasons.  The subjects are endless and they are easier to light and compose.  Water conditions are not a main factor in the success of your images either.  Here are some tips to get the best results out of your macro images.

Lens Selection

When selecting a macro lens, it’s pretty straight forward.  A 60mm macro lens is a popular choice for APS-C crop sensor cameras. They allow for extremely close focusing and are a pretty fast f/2.8 lens.  The Canon 100mm and the Nikon 105mm are popular as well due to their longer focal length which allows for a greater working distance between you and your subject. These longer lenses are really beneficial for shooting exceptionally small critters. Wet mount accessory lenses or diopters (INON UCL-165M67, Nauticam SMC) can also be attached to the outside of most macro ports (via thread) and allow you to get even closer to your subject.


Camera Settingsclown frogfish

Since you are not shooting an entire scene, set your camera for center-weighted metering and center point (spot) focus.  This will allow you the freedom to move the focus point around to a precise spot.

Manual Mode

For macro, Manual mode is the best. It allows you to take full control of your camera.

Aperture

Since you will be shooting a macro subject, you will be very close to your subject.  Your “depth of field” (DOF) will be quite small compared to wide angle. Therefore you will need to use small apertures to get a decent DOF in your images.

Macro photography on a 50mm – 60mm lens typically calls for an aperture of f/16 or smaller to maintain good DOF.  When shooting a 100mm lens or longer, you will likely target an f/22 or smaller aperture setting.  With that said, sometimes a small DOF is desired, if so, a wider aperture should be used.

mandarin fishShutter Speed

Set your shutter speed to the fastest shutter/flash sync.   Settings between 1/180 – 1/320 are generally the fastest shutter sync speeds on DSLR’s.  This will stop motion of a moving subject and camera shake.  A faster shutter speed will also darken the background helping separate your subject from the background.

ISO 100

I generally start at ISO 100. Depending on my exposure (histogram), this may be increased up to ISO 320.

Strobes

Set your strobes to TTL!  Strobes with a TTL option work great for macro photography. Shooting in TTL helps eliminate blown out highlights within the image.

For more creative lighting options, experiment with your strobe(s) at different power settings in Manual mode. INON Z-240’s and Sea & Sea YS-D1, and YS-D2 strobes are great for both TTL and Manual settings while shooting macro!

Compositionclownfish

Tightly framed subjects generally make for best macro compositions. Subjects that fill the frame help eliminate distracting elements that can take away from an image. Focus on the eyes! No tail shots!

Shooting Wide Angle

Fiji reef scene

Tokina 10-17mm lens @ 10mm, aperture f/8, shutter speed 1/160, ISO 100

Wide angle photography has yielded some of the most dramatic images we see in underwater photography! It is also the most difficult to shoot due to the many elements that make up a wide angle image.  Here are some of the basics to help you when shooting underwater wide angle images.

Lens Selection

There are a number of good lenses available for underwater wide angle photography. The lens should have a 100 degree angle of coverage (or more) with a minimum focus of 11” or less.  Lenses that have a minimum focus of 12″ or greater will require a diopter to be able to focus sharply behind a dome port underwater. Fisheye lenses are a popular choice too.  The Tokina 10-17mm fisheye lens has been the most popular choice since its inception and has a underwater angle of coverage of 100 degrees to 180 degrees (APS-C) and focuses down to 5.5″.

Dome Port Selection

Use a large 6”-10” dome:

  • With rectilinear lenses (Sigma 10-20mm, Sigma 8-16mm, Tokina 11-16mm, Canon 10-22mm, Nikon 12-24mm, etc.) or with fisheye lenses (Tokina 10-17, Sigma 15mm, Nikon 10.5mm, Canon 8-15mm)
  • For over/under shots (8″-10″ domes preferred)

Use a mini dome:

  • With fisheye lenses only
  • For close-focus wide angle shots
  • For travel (if minimizing your weight and system size are necessary)

Camera Settings

I often get asked what my camera settings are for my images.  Although I have consistent “pre-dive” settings, my settings vary from shot to shot throughout the dive depending on ambient light conditions.  When shooting wide angle images, I set my ISO to the days lighting conditions, generally keep my aperture constant, adjust my shutter speed for my blue water color, and adjust my strobes manually to light the foreground.

Manta

Sigma 10-20mm lens @ 10mm, aperture f/8, shutter speed 1/160, ISO 100

Shoot In RAW!!!

RAW files have 4000 color tones available to them.   JPEG images have only 350.

Metering Mode

When shooting wide angle, set your camera’s metering mode for Evaluative Matrix. This will allow your camera to meter the entire scene, not just the center of the frame.

Shoot anywhere from -1/3 to – 1 on your exposure meter. Underexposing your images will help make the colors pop and avoid overexposing highlights.

Manual Mode

If using strobes, shoot in Manual mode.  It allows you to take full control of your camera and eliminates the camera’s “auto” feature from being fooled.  Balancing your artificial (strobe) light with the ambient light (background) is crucial.

Shutter Priority

If shooting fast action and/or ambient light (no strobes), Shutter Priority (Tv) can be used. Set Exposure Compensation (+/- button) to -1/3.

Shutter Speed

This is what I use to control the blue water color. In other words, the shutter speed controls your background exposure. 1/125 is a great starting point and is also my “pre-dive” setting. The faster the shutter speed the deeper the blue water (or background) color.

ISO Setting

Use ISO 100-200 on bright days. On cloudy days, ISO 320-400 works well.  Your lowest ISO setting will give you the most optimum dynamic range within your camera.

Aperture

When using a large dome port (8” or more), f/8 is a good go to setting!  It allows great depth of field and sharp corners within the image.  When using a 6” dome set the aperture to f/9 –f/10 for sharp corners.  When using mini 4” domes, set the aperture for f/11 or smaller to yield sharp corners.  The center of your image, no matter what size dome you use, will be sharp.

White Balance

Shoot in auto white balance when using strobes!  For the majority of the time, Auto WB is accurate when using artificial light.

When shooting ambient light, you can custom white balance to the depth you’re at or WB can be adjusted in post.

Strobes

Although TTL can get good results, it is generally not the best mode when shooting wide angle images. There’s usually too much going on within the image that can pre-maturely shut the strobe(s) down before accurate lighting can be achieved.  Adjusting your strobe(s) output manually will yield better color saturatation.

Try to light with the angle of the sun.  The wider the lens – the closer the strobe should be to the lens/port and angled out, not in (especially for close-focus wide angle images).

diver in Fiji

Tokina 10-17mm lens @ 10mm, aperture f/8, shutter speed 1/250, ISO 200

Composition Tip

Try to manufacture / compose your wide angle images to have a 3D quality to them

  • Subject, coral, then sunball, boat or fish.
  • Keep main subject out of the middle of the frame.
  • Point the camera at a slight upward angle to take advantage of the ambient light for the background. This will add much better contrast than shooting down.
  • Try portrait shots.

Underwater Camera Settings

Underwater Camera settings

So you just purchased a new camera system.  Are you overwhelmed on what to do with all those buttons when you get underwater?  Here are a few camera setting tips to get you going.

Even though not all cameras have all the modes listed below, yours should have at least a couple two choose from.

Set your camera to shoot in RAW if available!

If you’re not using a strobe and are shooting Jpeg files,  be sure to “Custom White Balance” your camera every 15′ – 20′ of depth.  Read this article on Custom White Balance & Underwater Photography

What do these controls do?

  • Shutter Speed – Controls image blur.  1/125 is fast enough to stop most motion (camera shake and fish tails)
  • Exposure Compensation – Controls background exposure
  • Aperture – Controls depth of field and foreground exposure
  • ISO – Controls your camera’s sensitivity to light
  • White Balance – Calibrates your camera to the proper color spectrum while shooting ambient light images underwater

Here are some setting tips to get you started

  • (P) Program Mode
    • Set EV (Exposure Compensation) to –1/3 or – 2/3 on sunny days (Use to adjust background exposure)
    • Set ISO to 100 (Sunny day) 200 – 400 (Cloudy day)
    • Set Strobe on TTL or desired power
    • Set white balance to AUTO (if using a strobe)
  • (AV) Aperture Priority Mode
    • Set EV (Exposure Compensation) to –1/3 or – 2/3 on sunny days (Use to adjust background exposure)
    • Set F/8 aperture (F5.6 is fine for digicams)
    • Set ISO to 100 (Sunny day) 200 – 400 (Cloudy day)
    • Set Strobe on TTL or desired power
    • Set white balance to AUTO (if using a strobe)
  • (TV) Shutter Priority Mode
    • Set EV (Exposure Compensation) to –1/3 or – 2/3 on sunny days (Use to adjust background exposure)
    • Set Shutter Speed to 1/125
    • Set ISO to 100 (Sunny day) 200 – 400 (Cloudy day)
    • Set Strobe on TTL or desired power
    • Set white balance to AUTO (if using a strobe)
  • (M) Manual Mode
    • Set F/8 aperture (F5.6 is fine for digicams)
    • Set Shutter Speed to 1/125
    • Set ISO to 100 (Sunny day) 200 – 400 (Cloudy day)
    • Set Strobe on TTL or desired power
    • Set white balance to AUTO (if using a strobe)

Aquaventure Dive & Photo Center 10024 County Rd 81 Maple Grove, MN 55369 (763)424-8717